Amazon ECR
This tutorial will guide you on how to use your private Elastic Container Registry (ECR) with Okteto. It's recommended that you have the AWS CLI installed to follow this tutorial.
ECR credentials can be configured with either static credentials belonging to an IAM user or using OIDC federation to assume an IAM Role via Web Identity.
Using IAM User credentials
The steps to configure access to your private ECR using IAM User credentials are:
- Create a user with access to your private ECR
- Retrieve the user credentials
- Configure the credentials in Okteto
Step 1: Create a user with access to your private ECR
We recommend installing the AWS CLI before following this tutorial
Create IAM user with the AWS CLI by executing:
aws iam create-user --user-name private-registry-user
aws iam attach-user-policy \
  --policy-arn arn:aws:iam::aws:policy/AmazonEC2ContainerRegistryReadOnly \
  --user-name private-registry-user
Step 2: Retrieve the user credentials
Once we have the User created, we need to retrieve their credentials.
Create IAM user access key with the AWS CLI by executing:
aws iam create-access-key --user-name private-registry-user
{
    "AccessKey": {
        "UserName": "private-registry-user",
        "AccessKeyId": "<<your-access-key>>",
        "Status": "Active",
        "SecretAccessKey": "<<your-password>>",
        "CreateDate": "2023-10-10T09:08:27+00:00"
    }
}
Remember the value of AccessKeyId and SecretAccessKey. You will need them in the next step.
Step 3: Configure the credentials in Okteto
Add the following registry credentials to the Admin Registry Credentials view:
- Type:
AWS IAM User - Hostname: the default registry endpoint is
https://{AWS_ACCOUNT_ID}.dkr.ecr.{REGION}.amazonaws.com - Username:
AccessKeyIdfrom the previous step - Password:
SecretAccessKeyfrom the previous step
Using IAM Roles via OpenID Connect (OIDC) Federation
The steps to configure access to your private ECR using IAM Roles via OpenID Connect (OIDC) Federation are :
- Register the Identity Provider
- Create the IAM Role and Grant Access to ECR
- Configure the credentials in Okteto
Step 1: Register the Identity Provider
We recommend installing the AWS CLI before following this tutorial
The first step in configuring access to your private ECR is to register your Kubernetes cluster as an OIDC identity provider in AWS. To do this, Okteto provides the OIDC endpoint of your cluster, which can be found in the General page under the Integrations section of your Okteto Admin Dashboard.
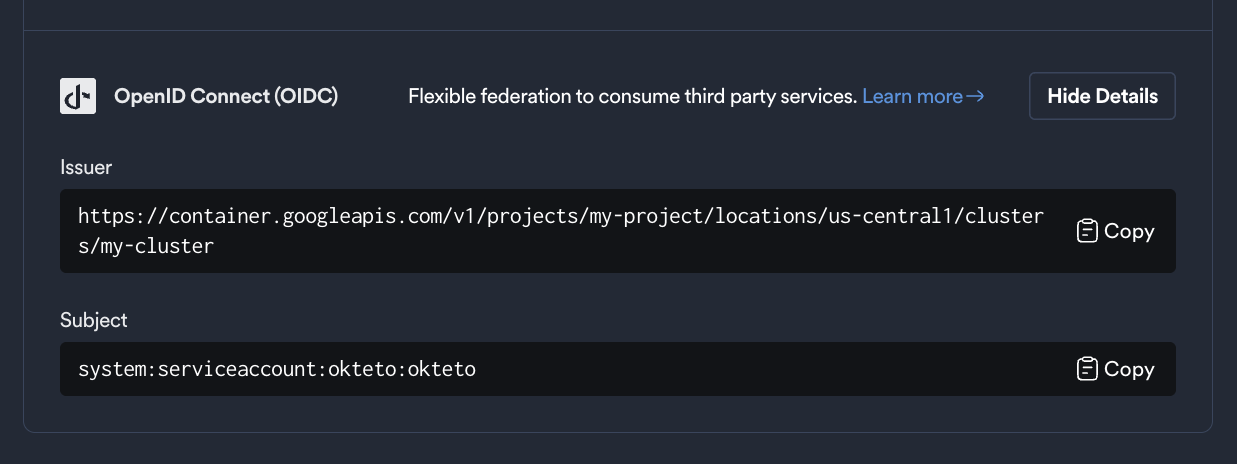
Store these values as environment variables, you will use them in the next steps:
export OIDC_ENDPOINT=https://container.googleapis.com/v1/projects/myProject/locations/us-central1/clusters/myCluster
export OKTETO_SERVICE_ACCOUNT=system:serviceaccount:okteto:okteto
The AUDIENCE is traditionally the client ID of the requester, and tokens will only be exchanged for these audiences.
It corresponds to the aud field in the JWT payload. We recommend creating a unique audience for each Okteto instance and AWS region.
For example:
export AUDIENCE=okteto.example.com/us-east-2
Next, run the following command to create the OIDC identity provider in AWS:
aws iam create-open-id-connect-provider --url "${OIDC_ENDPOINT}" --client-id-list "${AUDIENCE}"
Once successful, you’ll see a response similar to:
{
    "OpenIDConnectProviderArn": "arn:aws:iam::112233445566:oidc-provider/container.googleapis.com/v1/projects/myProject/locations/us-central1/clusters/myCluster"
}
Store this value in an environment variable, you'll use in the next step:
export ROLE_ARN=arn:aws:iam::112233445566:oidc-provider/container.googleapis.com/v1/projects/myProject/locations/us-central1/clusters/myCluster
Step 2: Create the IAM Role and Grant Access to ECR
In this step, you'll create an IAM Role that allows access to ECR and configure it to be assumed using the OIDC identity provider created in the previous.
First, create the trust policy that allows the IAM Role to be assumed by the OIDC identity provider.
Save the following content to a file named trust-policy.json (replace your environment variables):
{
  "Version": "2012-10-17",
  "Statement": [
    {
      "Effect": "Allow",
      "Principal": {
        "Federated": "${ROLE_ARN}"
      },
      "Action": "sts:AssumeRoleWithWebIdentity",
      "Condition": {
        "StringEquals": {
          "${OIDC_ENDPOINT}:aud": "${AUDIENCE}",
          "${OIDC_ENDPOINT}:sub": "${OKTETO_SERVICE_ACCOUNT}"
        }
      }
    }
  ]
}
Run the following command to create the IAM Role in AWS with the trust policy you defined:
aws iam create-role --role-name my-private-registry --assume-role-policy-document file://trust-policy.json
You will receive a response similar to this:
{
    "Role": {
        "Path": "/",
        "RoleName": "my-private-registry",
        "RoleId": "AR...",
        "Arn": "arn:aws:iam::112233445566:role/my-private-registry",
        "CreateDate": "2024-06-10T15:04:05+00:00",
        "AssumeRolePolicyDocument": {
            "Version": "2012-10-17",
            "Statement": [
                {
                    "Effect": "Allow",
                    "Principal": {
                        "Service": "ec2.amazonaws.com"
                    },
                    "Action": "sts:AssumeRole"
                }
            ]
        }
    }
}
Now, attach an ECR policy to allow pulling from the registry:
aws iam attach-role-policy --role-name my-private-registry --policy-arn arn:aws:iam::aws:policy/AmazonEC2ContainerRegistryReadOnly
Step 3: Configure the credentials in Okteto
Now that you've created the IAM Role, the final step is to configure the credentials in Okteto.
Add the following registry credentials to the Admin Registry Credentials view in the Okteto Admin Dashboard:
Start by navigating to Admin -> Registry Credentials under the Integrations section.
Click "Add Credential" and use the following settings:
- Type:
AWS IAM Role - Hostname: The ECR registry endpoint is
https://{AWS_ACCOUNT_ID}.dkr.ecr.{REGION}.amazonaws.com - Role ARN: The Role ARN
ROLE_ARNyou created in Step 1 - Audience: The Audience
AUDIENCEyou specified during the Identity Provider setup
You can also configure these credentials via Kubernetes CRDs. This is useful when you want to automate the configuration of your Okteto instance (e.g. IaaC as Terraform or GitOps with ArgoCD).