Configure access to your AWS account using IAM Roles
This guide walks you through configuring AWS credentials for your Okteto instance to enable the commands in your Okteto Manifests to interact with your AWS account.
We will focus on requesting access to an S3 bucket. However, you can extend this approach to grant access to other AWS resources by specifying a role with the necessary permissions.
AWS credentials are configured using OIDC federation to assume an IAM Role via Web Identity. This provides secure and temporary access to your AWS resources.
Step 1: Register the Identity Provider
Before starting, we recommend installing the AWS CLI
The first step in configuring AWS credentials is to register your Kubernetes cluster as an OIDC identity provider in AWS. To do this, Okteto provides the OIDC issuer and subject of your cluster, which can be found under the Integrations -> Cloud Credentials section of your Okteto Admin Dashboard.
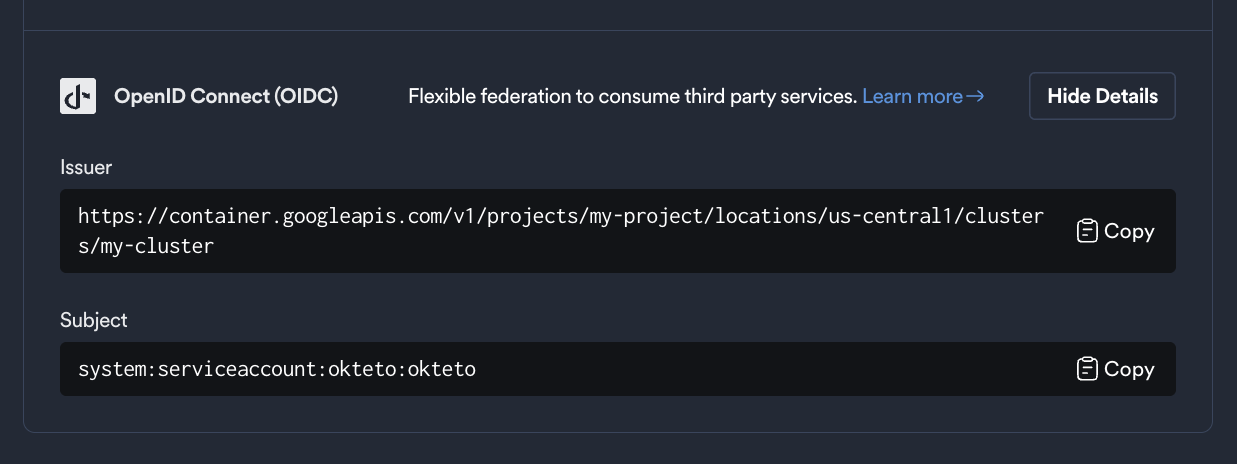
Store the values as environment variables, you will use them in the next steps:
export OIDC_ISSUER=https://container.googleapis.com/v1/projects/myProject/locations/us-central1/clusters/myCluster
export OIDC_SUBJECT=system:serviceaccount:okteto:okteto
Next, define the AUDIENCE.
The AUDIENCE is traditionally the client ID of the requester, and tokens will only be exchanged for these audiences.
It corresponds to the aud field in the JWT payload. We recommend creating a unique audience for each Okteto instance and AWS region.
For example:
export AUDIENCE=okteto.example.com/us-east-2
Next, run the following command to create the OIDC identity provider in AWS:
aws iam create-open-id-connect-provider --url "${OIDC_ISSUER}" --client-id-list "${AUDIENCE}"
Once successful, you’ll receive a response with the provider ARN:
{
    "OpenIDConnectProviderArn": "arn:aws:iam::112233445566:oidc-provider/container.googleapis.com/v1/projects/myProject/locations/us-central1/clusters/myCluster"
}
Store this value in an environment variable, you'll use it in the next step:
export PROVIDER_ARN=arn:aws:iam::112233445566:oidc-provider/container.googleapis.com/v1/projects/myProject/locations/us-central1/clusters/myCluster
Step 2: Create the IAM Role and Grant Access to S3
In this step, you'll create an IAM Role that allows access to S3 and configure it to assume the role using the OIDC identity provider you set up in the previous step.
Create the Trust Policy
First, create the trust policy that allows the role to be assumed by the OIDC identity provider. To do this, create a local file named trust-policy.json, copy the contents of the file below, and substitute the placeholder values with the resources that we created in the previous steps:
{
  "Version": "2012-10-17",
  "Statement": [
    {
      "Effect": "Allow",
      "Principal": {
        "Federated": "<PROVIDER_ARN>"
      },
      "Action": "sts:AssumeRoleWithWebIdentity",
      "Condition": {
        "StringEquals": {
          "<OIDC_ISSUER>:aud": "<AUDIENCE>",
          "<OIDC_ISSUER>:sub": "<OIDC_SUBJECT>"
        }
      }
    }
  ]
}
For reference:
- OIDC_ISSUER: The OIDC Issuer of your Okteto instance
OIDC_SUBJECTthat we retrieved in Step 1, without the "https://" part of the url. - OIDC_SUBJECT: The OIDC subject of your Okteto instance
OIDC_SUBJECTthat we retrieved in Step 1. - AUDIENCE: The audience
AUDIENCEthat we defined in Step 1. - PROVIDER_ARN: The ARN of the OpenID connect provider
PROVIDER_ARNthat we created in Step 1.
A completed file will look similar to this example:
{
  "Version": "2012-10-17",
  "Statement": [
    {
      "Effect": "Allow",
      "Principal": {
        "Federated": "arn:aws:iam::112233445566:oidc-provider/container.googleapis.com/v1/projects/myProject/locations/us-central1/clusters/myCluster"
      },
      "Action": "sts:AssumeRoleWithWebIdentity",
      "Condition": {
        "StringEquals": {
          "container.googleapis.com/v1/projects/myProject/locations/us-central1/clusters/myCluster:aud": "okteto.example.com/us-east-2",
          "container.googleapis.com/v1/projects/myProject/locations/us-central1/clusters/myCluster:sub": "system:serviceaccount:okteto:okteto"
        }
      }
    }
  ]
}
Run the following command to create the IAM Role in AWS with the trust policy you defined:
aws iam create-role --role-name okteto-credentials --assume-role-policy-document file://trust-policy.json
You will receive a response similar to:
{
    "Role": {
        "Path": "/",
        "RoleName": "okteto-credentials",
        "RoleId": "AR...",
        "Arn": "arn:aws:iam::112233445566:role/okteto-credentials",
        "CreateDate": "2024-06-10T15:04:05+00:00",
        "AssumeRolePolicyDocument": {
            "Version": "2012-10-17",
            "Statement": [
                {
                    "Effect": "Allow",
                    "Principal": {
                         "Federated": "arn:aws:iam::112233445566:oidc-provider/container.googleapis.com/v1/projects/myProject/locations/us-central1/clusters/myCluster"
                    },
                    "Action": "sts:AssumeRoleWithWebIdentity",
                    "Condition": {
                        "StringEquals": {
                            "container.googleapis.com/v1/projects/myProject/locations/us-central1/clusters/myCluster:aud": "okteto.example.com/us-east-2",
                            "container.googleapis.com/v1/projects/myProject/locations/us-central1/clusters/myCluster:sub": "system:serviceaccount:okteto:okteto"
                        }
                    }
                }
            ]
        }
    }
}
Store the ARN of the role you just created in an environment variable, you'll use it in the next step:
export ROLE_ARN=arn:aws:iam::112233445566:role/okteto-credentials
Finally, attach the S3 policy to the IAM Role to grant it full read and write access to your S3 buckets:
aws iam attach-role-policy --role-name okteto-credentials --policy-arn arn:aws:iam::aws:policy/AmazonS3FullAccess
This grants the IAM Role the necessary permissions to interact with S3.
Step 3: Configure AWS Cloud Credentials in Okteto
Now that you've created the IAM role, the final step is to configure the AWS credentials in Okteto.
There are two different ways that Cloud Credentials can be configured in Okteto:
- Cloud Credentials in the Okteto Admin Dashboard - Follow the below steps to add credentials via the Admin dashboard
- Cloud Credentials via a CRD - Follow this guide to add your cloud provider credentials via a CRD
Please note that if you add credentials using CRDs they will be displayed in the Dashboard, but they cannot be modified from this view.
Adding Cloud Credentials Through the Admin Dashboard
- Go to the Cloud Credentials view view in the Okteto Admin dashboard
- Enable the AWS IAM Role option

- Provide the following information:
- Role ARN: The Role ARN
ROLE_ARNyou created in Step 2. - Region: The AWS Region for the AWS STS Regional Endpoint. You can find more information about regional endpoints here and here
- Audience: The Audience
AUDIENCEthat we defined in Step 1.
Once this configuration is in place, your Okteto Manifests commands will have access to your AWS account.
Example Okteto Manifest
With the configuration complete, the following example Okteto Manifest can interact with the specified S3 bucket:
deploy:
  image: amazon/aws-cli
  commands:
    - aws s3 mb s3://test-bucket --region us-west-2

test:
  aws:
    image: amazon/aws-cli
    commands:
      - aws s3 ls | grep test-bucket

destroy:
  image: amazon/aws-cli
  commands:
    - aws s3 rb s3://test-bucket --region us-west-2