Connect your applications across multiple namespaces

Okteto Cloud gives you access to Kubernetes namespaces, helping you focus on your application, instead of the infrastructure. Our initial idea was to keep the namespaces fully isolated, but our community started to come up with very interesting use cases. We're happy to announce that your applications can now connect to each other across all your Okteto Namespaces!
New to Kubernetes or just want to learn more?
Accessing your applications and services from another namespace is as easy as calling them using $service_name.$namespace.
Our Okteto Developer Pro plan gives you two namespaces, each with 4 CPUs, 8Gi of RAM and 20GB of storage. With this new feature, you can deploy your database in one namespace, and the rest of your application on a different namespace, keeping it separate, but accessible. Or maybe you want to take advantage of the extra CPU and Memory that all your Okteto namespaces give you to run your more complex applications?
How Does it Work?
In an standard Kubernetes installation, all namespaces are accessible from anywhere in the cluster. This is a very useful thing when you are the only developer using the cluster. But this will quickly turn into a problematic situation as soon as you have more than one developer sharing the same cluster. First, that can become a security issue: you don't want unauthorized users accessing your internal services. Second, it's practical to have isolated namespaces, so you don't have to worry about hitting the wrong application, rogue traffic, etc.
Network Policies where designed to help with this. Through them, you can create policies that block or allow traffic based at the pod, namespace, or at the IP level. It's a very handy tool, but using well requires deep understanding of both networking as well as Kubernetes infrastructure. This is a fantastic feature, but is not very developer friendly.
At Okteto Cloud, we enable developers to focus on building their Cloud Native applications, instead of fighting infrastructure. When you create a namespace or deploy an application, Okteto will automatically create all the necessary configurations and network policies required to ensure that your applications and services can reach each other in a secure and private way, without you having to configure anything.
Let's explore the different ways that applications can be accessed while running in Okteto Cloud. To do this, we're going to be using our version of the Guestbook application. In case you are not familiar, the Guestbook application consists of a web front end (written in Go) and a Redis instance for storage, all deployed using Kubernetes manifests.
Clone the Guestbook Application
Get a local version of the Guestbook Application by executing the following commands:
$ git clone https://github.com/okteto/guestbook-go
$ cd guestbook-go
Deploy the Database
To begin, deploy the Redis instance on your personal Okteto Cloud namespace. To deploy it, you'll need to login to Okteto Cloud, download your Kubernetes credentials, and run the command below:
$ kubectl apply -f manifests/redis.yamlservice/redis created
statefulset.apps/redis createdThis will create an instance of redis on your namespace. It will also create a service, enabling other applications to access the instance on Redis' port, 6379. The instance will only be available from inside your Okteto Cloud namespaces.
Access Applications Running on the Same Namespace
In order to access an application running in the same namespace, all you need to do is access it via the servicename. To find out the service name, you can take a look at the manifest, or directly run the kubectl get servicecommand in your terminal:
$ kubectl get serviceNAME TYPE CLUSTER-IP EXTERNAL-IP PORT(S) AGE
redis ClusterIP 10.132.20.152 <none> 6379/TCP 30sIn this case, the service named redisis available over port 6379.
To test it, let's deploy the Guestbook web frontend with the command below. The frontend is already configured to use redisas the Redis hostname, so we don't need to change anything.
$ kubectl apply -f manifests/guestbook.yamldeployment.apps/guestbook created
service/guestbook createdTo access the Guestbook from our local machine, we'll forward port 8080 using the command below:
$ kubectl port-forward svc/guestbook 8080Forwarding from 127.0.0.1:8080 -> 8080
Forwarding from [::1]:8080 -> 8080Verify that the application functions correctly by opening your browser and going to http://localhost:8080. Add a couple of entries so we can start reading and writing from the database.


At this point, we have our web frontend talking to redis, both hosted on the same namespace, using the service name as the Redis host. In the next step, we'll show you how to split them into two different namespace.
Before doing that, kill the port-forwardcommand with CTRL+C, and delete the Guestbook web frontend with the command below:
$ kubectl delete -f manifests/guestbook.yamldeployment.apps "guestbook" deleted
service "guestbook" deletedAccess Applications Running on a Different Namespace
Now, we're going to separate the application and database into two different namespaces.
First, let's create a new namespace. In order to be able to create a second namespace, you'll need an Okteto Developer Pro account. If you don't have one already, you can start your 14-day free trial by clicking here.
Click on the Namespacedrop down menu, and then on the New Namespacebutton at the bottom on of the menu.

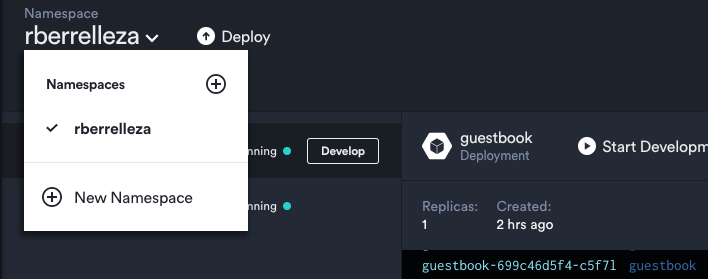
This will open the New Namespacedialog. Pick a name for your new namespace (I went with app-rberrelleza), and click create.


This will create the namespace for you in Okteto Cloud, as well as the necessary configurations and policies for you. Our new namespace is now ready to go!
In order to access an application running in a different namespace, you need to add the namespace to the service name, as if it was its domain. For example, if your first namespace was named cindylopez, the same redisinstance we accessed on the previous example would be available via redis.cindylopez.
Let's try it out. Open the manifests/guestbook.yaml file on your favorite IDE, and change the value of the REDIST_HOST environment variable (line 19), from redis to redis. <NAMESPACE>, with <NAMESPACE> being the name of your personal namespace (the one that matches your GitHub Username).
...
      containers:
      - image: okteto/guestbook:golang
        name: guestbook
        env:
          - name: REDIS_HOST
            value: redis.rberrelleza
...
After modifying the file, deploy the Guestbook web frontend in your new namespace by running the command below, replacing <YOUR-NEW-NAMESPACE>with the name of the namespace we created on this step.
export NAMESPACE=<YOUR-NEW-NAMESPACE>
$ kubectl apply -f manifests/guestbook.yaml --namespace $NAMESPACE
deployment.apps/guestbook created
service/guestbook createdTo access the new instance of the Guestbook from our local machine, we'll forward port 8080 with the command below, just like we did on the previous step. Do notice that we're running the command on the new namespace this time:
$ kubectl port-forward svc/guestbook 8080 --namespace $NAMESPACEForwarding from 127.0.0.1:8080 -> 8080
Forwarding from [::1]:8080 -> 8080Go back to your browser, and navigate to http://localhost:8080.

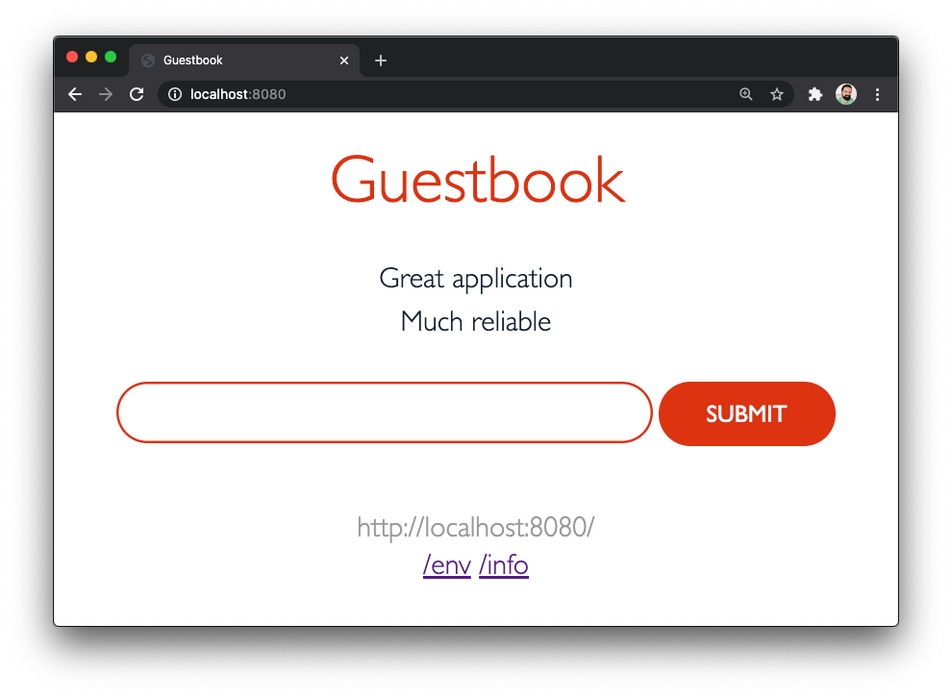
Notice how the Guestbook is displaying the same information than before. This is because it's talking to the same database as before, even when we deployed it into a new namespace. Add a few more entries to try it out.
Once you're done, press CTRL+Cto stop the port-forwardprocess.
Expose an Applications Publicly
So far, we've been accessing the application through port-forwards. This is fine for internal applications, but it's not how we want our users accessing the application.
In order to expose your application to your users, you'd typically need to setup a load balancer, get a domain, create the corresponding DNS entry and generate an SSL certificate. All of this takes time and resources away from developing your applications.
Things are easier with Okteto Cloud. All you need to do is set the service type to LoadBalancer, and Okteto will automatically generate all the required infrastructure for you and your users to access your application via a public HTTPs endpoint.
Let's try it out. Open manifests/guestbook.yamlin your favorite IDE, change the service type to LoadBalancer, and save the file:
apiVersion: v1
kind: Service
metadata:
  name: guestbook
spec:
  type: LoadBalancer
  ports:
  - name: guestbook
    port: 8080
  selector:
    app: guestbook
Redeploy the application so the changes are applied:
$ kubectl apply -f manifests/guestbook.yaml --namespace $NAMESPACEdeployment.apps "guestbook" unchaged
service "guestbook" configuredGo back to your browser, and navigate back to Okteto Cloud to retrieve the public endpoint of your application. It'll be right there on the UI:

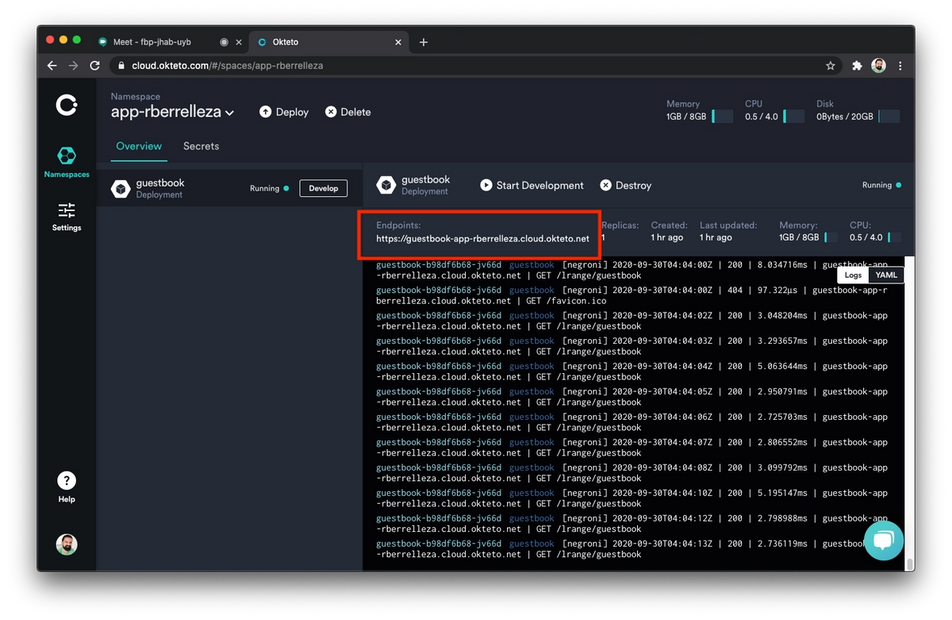
Click on the link to access your application using the public endpoint. Just like your users will do once your ship your application!


Conclusion
In this post we showed you how to deploy your application and how to access other services deployed in the same service. We then showed you how you can scale it out by accessing applications and services deployed in other namespaces. Finally, we showed you how you can take any of your applications and exposing them publicly, HTTPs endpoint included.
We believe that developers deliver their best work when they can focus on their applications and the value they create for their users, instead of worrying about Kubernetes and its configuration. The Okteto Cloud networking features we showed you today is a good example of this.
Sign up to our free 14-day trial and start building your Cloud-Native applications with the power of Okteto Cloud today 💪!
Discover how Okteto simplifies Kubernetes.


 Arsh Sharma